
How I Learnt to Love macOS Screenshots

I like to share bits of my screen on a regular basis. A quick look at my screenshot folder suggests I’ve done this at least 5,000 times in the past five years. Usually I’m sharing something but increasingly I’m making a recording, like a cancellation confirmation or bill payment. I usually forget about these if I don’t need them, but when I do I can dig through my screenshots folder and see what I can find.
The macOS screenshot app is very well made but it does have a weakness, namely it’s a time consuming multi-step process to actually getting the screenshot and attaching the resultant screen snip to whatever medium — email, slack, sms, twitter, etc. — you’re focused on, especially if I want to use my iPhone to send the screenshot but my Mac to take it.
In response, I kludged something together which works really well for me as it provides the following features:
- Automatic copy to clipboard
- Automatic sync between all my devices
- No files left to clutter up my desktop
- Free*
Here’s how you can do this too.
Step 1 — Move Screenshots Folder off the Desktop
There is a way to do this using the screenshot app itself, I prefer the command line. Open the command prompt and type the following command, all on one one line, remembering to substitute YOURUSERNAMEINLOWERCASE for your actual user name:
defaults write com.apple.screencapture location "/Users/YOURUSERNAMEINLOWERCASE/Library/Mobile Documents/com~apple~CloudDocs/Screenshots"
This version of the command will redirect screenshots to your iCloud Drive, where it will sync to all your other devices, including your mobile devices. Of course, you might not have an iCloud Drive, or you might be using Dropbox, in which case try:
defaults write com.apple.screencapture location "/Users/YOURUSERNAMEINLOWERCASE/Dropbox/Screenshots"
Or even, for no syncing, just:
defaults write com.apple.screencapture location "/Users/YOURUSERNAMEINLOWERCASE/Screenshots"
You can test this now, by pressing the keys CMD+ SHIFT +5, selecting a piece of your screen, pressing return, and then checking to see if it’s in the directory you selected. It may take a second or two to get there, so don’t worry if it doesn’t turn up instantly.
Now you have moved your screenshots directory, possibly to somewhere it automatically synchronizes, it’s time to automatically copy new clips to the clipboard.
Step 2 — Automatically Copy New Screenshots to the Clipboard
Once you’ve got a clip, traditionally you’ve got to open the folder, drag it to your app, maybe send it to your phone. It’s a bit of a hassle. That’s why the screenshots go on the desktop in the first place.
We can do better than that, and copy it immediately to the clipboard. Then you can paste it into whichever app you like, without any extra steps, even if you took the screen cap on your Mac and are pasting it on your iPad or iPhone.
To do this we will use an app called Hazel, by Noodlesoft.
Hazel is a pretty interesting tool that will run an action for you every time a certain event happens. In this case, any time a new file is added to the Screenshots folder, Hazel will copy it to your clipboard.
For what we’re doing here you can easily use Hazel for free in Demo mode. I paid the $42 as I’m using it for other things, but now its free ‘Demo’ mode is just fine. (NOTE: I have no connection with the developers of Hazel and they aren’t involved in nor were notified of this article.)
Older versions of Hazel live in the preferences panel, starting with version 5 it’s an independent app. That’s what we’re going to use here.
First, install Hazel by following these instructions here: https://www.noodlesoft.com/manual/hazel/installation-setup/install-hazel/
Now, go make sure notifications are enabled for Hazel. This option won’t appear in Preferences until you’ve run Hazel once. Even if you don’t plan on using notifications, we need this for the final validation step.
Once you’re in the Hazel app, add the folder you selected above to Hazel. Mine is simply called Screenshots.
Next, select the folder and create a new ‘Rule’. It will need a name, mine is called Copy Screenshots to Dashboard.
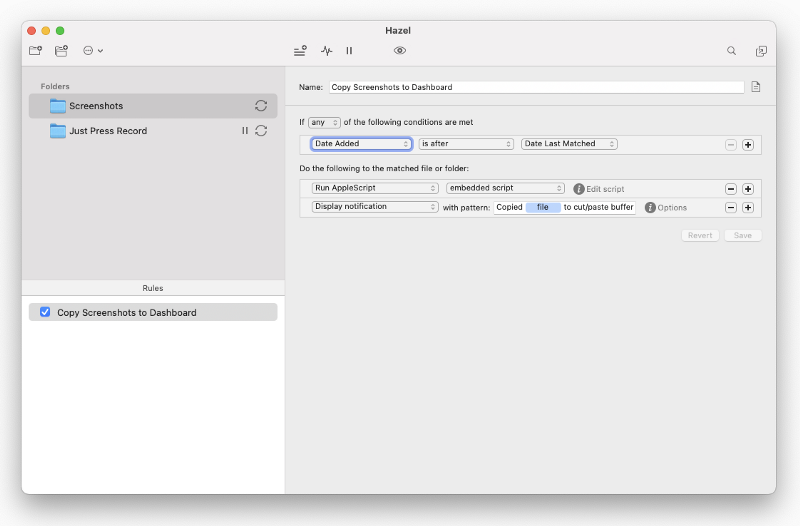
Next we will need to add and then configure an ‘Action’ for this rule, on the right hand side of the dialog. Configure it just like the screenshot below (ignore the Just Press Record folder):
For the embedded script, cut/paste the following code:
try
  set pngData to read theFile as «class PNGf»
  set the clipboard to pngData
end try
Very simple. Save everything. If you’re feeling brave you can even close the Hazel dialog as it runs in the back ground.
To test, just take a screenshot again, by pressing the keys CMD + SHIFT + 5. You should see the selected clip appear in the bottom right of the desktop, and then after a second disappear. Finally, a second or two later the Hazel app should show a notification that the file was copied to the clipboard.
You should now be able to paste the screenshot into wherever you like. If you need to trim or edit it, you can do it in the step before Hazel gets hold of it by clicking on the bottom right preview that macOS offers for a few seconds each time you clip.
Step 3— Add Ons!
There are a few ways you can make this kludge even more useful:
- If you are running multiple desktops, setup Rule Sync on Hazel. This will make everything the same on each desktop. This works best with iCloud Drive/Dropbox, as you will never lose a shot. This is only necessary if you are actively using multiple desktops, like a laptop and a big old Mac at home or in the studio.
- Add your Screenshots folder to the siderbar in the Open Dialog. This is easy: just drag the folder into the left hand sidebar in any Finder window.
- Sort by reverse modified date, so the latest screenshots are always at the top. This is a little bit fiddly, in that you need to wait for an application to present the Open Dialog, to select a file from the screenshots folder. Then you can sort by clicking on the Modified column.
Hopefully you’ll find this as useful as I do. Enjoy!
Comments